Monday, May 21, 2012

The Tracy Aviary


 We lucked out a month ago and got in on a terrific deal on Utah's Pass of All Passes.  We get to go to water parks and lots of fun sporting and other events.  The other plus for us, is that on Mondays, we get to go to the Tracy Aviary, as well.  We've been several times now, and the kids really do love it. Today, we hit the aviary again.  It wasn't terribly busy, and we got there in time to see the bird show before we had our picnic lunch.


 At the show, we got to see an adorable toucan named Ingrid.


 An emu, aptly named, Sydney, who was a rather funny guy. As well as a rather shy parrot.

I think the kids favorite part was running around pretending to migrate across the stumps and stones labeled with flyover stops for birds migrating through this area.  It was a hit.


So, okay, penguins aren't birds that migrate through Utah, but Winnie couldn't resist the cute little chick perched on his father's feet in this drawing.

The eyelashes on the hornbills kill me.
 They were extremely interested in the kids.  We had a whole gathering.


The kids were greeting this friendly peacock.  He was so friendly that he tried to join in on the bird show unexpectedly.

These guys shared their enclosure with a special surprise -- very new ducklings.  There were 10 of them, and the mama duck was frantic trying to keep track of them as they swam and ran all over her.  The father duck was sleeping in the corner of the enclosure.  
The kids thought this was pretty funny. :)


Monday, February 20, 2012

Patience, grasshopper


Remember how I am always telling you that it will happen if you wait, watch, and don't push.  It is much easier said than done.  I have read all the unschooling books, I talk the talk myself all over the place, but in my darkest moments I still question it.  Maybe "it" won't happen.  Sure he learns, but what about school stuff?

Angus is "special," things don't come as easily, he has a diagnosis, he's not terribly focused, he's left-handed, yadda yadda -- what if reading, and exposing him to the things, and not pushing, but waiting until he's ready doesn't work?  What if he doesn't have a time for writing?  What if he's 18 and can't read.  What if, what if??? 

Thankfully, Adam (my husband) has an infinite amount of patience.  "It will happen," he says.  "You know it will, it just isn't happening on your time schedule, and that's bothersome for you, but not for him."  And he's right, and then, just like Leo the Late Bloomer's father, I go back to reading my paper and waiting.


It doesn't help that, especially with Angus, there is no suggesting.  No pushing.  No "hey let's try."  Until he'd ready, he's not ready.  So I wait.


I will say, that when you wait like that, that when it happens, it's big.  You are excited, you get supplies, you sit with him in rapt anticipation.  Things get hung up and framed.  I should probably not make such a big deal of it, but I get excited.  :)


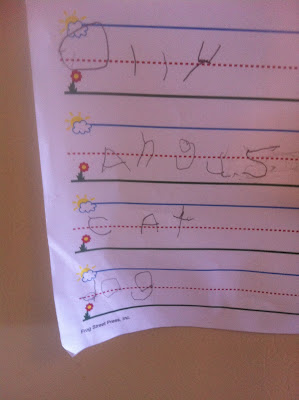
 So it was today, that I was a happy mama when Angus started rooting around for a piece of paper.  "Hey, dude, do you need something," I asked.  "I need to practice writing the letter b," he says.  I think never in the history of momdom has a mom moved faster to get paper, pencils, and the alphabet card I have for them to reference letters.  He wrote.  He practiced his whole alphabet in some form  "Hey, Angus," says I," if you can write a b, you can write a d, and a p, and a q."  We went from there.  There were letters and numbers, and he was awesome, and the angels sung for a bit for this mama.

Then there was some spelling and sounding out of things, and it was pretty amazing.  This page is currently on our refrigerator.


Then even Winnie got in on some fun.  She wrote a little, and they did some counting with farm animals.  And as quick as it came, it was gone, but he has the skills.  I know he does, I saw it.  And he was happy, and proud of himself.  And again I can wait, quietly, as every day he learns, and some days he even learns things that calms my nerves about "real" school versus doing it at home.  Life is beautiful in our neck of the woods.  Every day, and some days it actually looks a tiny bit like "school."  And that's okay, I guess.  :):):::::::::::::)))))):)))  (Winnie's blog contribution)


Of Plastics, Polymers, and Pinterest

If you homeschool, and have not found pinterest, you need to -- fast! For us it's a great place to find ideas for science experiments, craft projects, and so much more.  Trust me.  You will not regret it. 

So it was on that note that this morning we set out to make plastic, after having found a cool science experiment on pinterest over the weekend.  We learned a little about plastics and polymers, and then we made bouncing balls.  This is the tutorial we used. 

Okay, in advance, let me tell you a few things we learned.  First of all, they will not be as clear as the picture there, but it's still definitely worth the experiment.  Secondly, they are not going to hold together as beautifully as a commercially-manufactured bouncy ball.  In that, if you whack it really really hard, it will bust open, however, that was one of the coolest parts of it for us, as they are amazing inside.  One last thing, stir it into a ball, and start rolling it in your hands before it's too hard to stir.  Okay, that said, here we are doing it.

 
We're rolling, rolling, rolling.

   Rolling, rolling, rolling


 Look, we made bouncy balls!


This isn't a clean one, so, yay, do it in the kitchen. :)


Sunday, November 27, 2011

Shopping Bags to Shopping Bags

We do a mostly homemade Christmas here.  We're not big into consumerism, or shopping.  We buy a few things, but we make infinitely more than we buy.

The other night, Zhara and I found a few posts on reusing plastic shopping bags.  We try and use reusable often, but sometimes an occasional plastic bag cannot be avoided, and so, during the year, we save them for various things.  This year we are making reusable shopping bags and purses to give gifts in.

Here is a tutorial :

The first thing you need to do is fuse the bags.  We found this tutorial that was pretty helpful.  My suggestions is to fuse 8 layers of bag at a time.  This means that you should cut off the handles, and then fuse either 4 bags without cutting them open, or 8 bags cut open.  This basically just depends upon the size of bag that you want to finish with, as the cut open sections will create larger fused sheets to work with later.  Try and put the printed sides to the inside to prevent the ink from running.  That can mean turning the bags inside out, or opening them up and putting two printed sides towards each other.

I put a towel on our tile counter top, and placed the bags on that, and covered them in a piece of parchment paper that was slightly larger than the bags to be fused.  Apply an iron that is on the permanent press of cotton setting to the parchment paper.  You will be able to lift up the paper and see the plastic fusing.  Make sure to get the edges.  Turn over and do the other side.  When it is completely fused, you can decorate.

Zhara wanted to make them especially awesome by cutting out sayings or pictures or letters to create new words, sayings, or pictures on the finished bags.  My suggestion is to apply these at the very end, lest you melt the lettering.  Place them on the bag, cover with the parchment paper, and fuse those briefly until they are completely adhered.  Let your sheets cool.

I went ahead and did like 20 sheets of bags with all of our old bags, then took them to my sewing room when cooled, and used them like fabric to make multiple bags.

I did several versions of bags, but since most of them would be going to women or couples, I tried to make them usable either as small shopping bags or purses.  I gave them reinforced fabric handles (or you could purchase handles at the fabric store), and a small pocket inside.  I also gave them a velcro closure (though you could use any type of closure) so that they could be more secure if used as a purse.  I made the smaller version to the left by cutting two identical sizes of fused bags and sewing around three sides with the right sides together.  I sewed perpendicular across the bottom seam and trimmed the excess to make a stand up bag. Turn it inside out.  Then I decided to reinforce it some more.


I sewed around the bottom to make it sit easier. I also zig-zagged around the top seam to make it more durable.

I think this size would be great as a small produce bag, for light shopping, like the pharmacy, or as an everyday purse. I plan on giving this one with a bottle of my husband's homemade wine and some homemade chocolates, or a pair of homemade flannel pj pants for a lovely holiday gift.

The other size I've made so far is larger.  It has two wide identical rectangles for the front and back, and two narrow identical rectangles for the sides, and another rectangle for the bottom.  My tip is to sew the four sides, inside out first. Then size the final rectangle after those are sewn.  Pin it to the bottom, and sew all the way around.  Turn it right side out, reinforce where you'd like, I sewed about three inches down the top of each side to make it naturally turn in instead of out.  I also zig-zagged the top, added fabric handles, an inside pocket, and a velcro closure.  

I think this one would be a great size for a regular shopping bag, a larger purse, or a diaper bag. You could fit most gifts in this bag.

The smaller bag contains about 8 former plastic bags.  The larger one around 16-20.  You can make them as large or small as you'd like.  My daughter has already requested small purse sizes for her friends for Xmas.  

Make something from the heart, reuse an item that has major ecological implications for our planet, and perhaps pass along a love for the planet and taking care of it, to someone who might not otherwise use something recycled.  Perfect!

Monday, October 10, 2011

Magnetism


A couple of weeks ago, we discovered that Lowe's has these awesome horseshoe magnets for $1.70 a piece.  Today we bought three more of them (one for each kid, because I was attempting to minimize fights).  We decided to learn some things about magnetism.  So I pulled out one of our science experiment books, and a piece of poster board, and we got to it.  We decided to record our findings on the poster, then as we learn more, we can add on.

First, we told each other what we already knew about magnets, and I wrote that down.  Then I sent the kids on a scavenger hunt to find household items, and we tested them with our magnets, which taught us even more about magnetism and what magnets do and do not attract.


 Then we did an experiment with a glass jar, and some paper clips to see if we could move them through the jar with the magnet.  We could, even when they were attached to something heavy like a clay snake.  We tried several other mediums to try and pull things through.  The table was too thick.  A lego board worked. As did a plastic cup.

We learned about polarity, and the north-south pull of magnets, and did an experiment by putting the horseshoe magnet on a stick and watching it "magically" rotate so that it was always pointing north/south.

Overall, a very fun way to spend an afternoon.

The Corn Maze and Pumpkin Patch

Eli and Wednesday as Frankenstein and his bride
 This story could start with, it was a cold and wet afternoon, when the Dayhoffs and McKinneys trudged through the corn maze.  Wow, was it ever!  Despite much of the country, our late summer/early fall has been very warm, so we were rather taken aback when we arrived at the pumpkin patch on Saturday and it was around 50 degrees and raining.  But we trudged on, as we were there, with our friends, and we were going to do this thing.


 There was a great deal of discussion about which way to go to get through the very long, very windy corn maze.  Sometimes they took votes, sometimes they asked dad.  Wednesday just ran.  The whole time.  Very loudly.  Everyone has their own method.

 We knew it had rained, but we had no idea the extent of the mud.


Did I mention it was muddy?  Very muddy?  Like the end times muddy?  Yay, it was.


 A rare moment of Wednesday neither screaming nor running in the corn maze.  She's waiting to have her list punched so she could get a piece of candy at the end for completing the whole maze.


 After we made our way out of the mud, er, I mean corn maze, we headed over to the pumpkin patch.  The pumpkins were huge this year, and the pumpkins are all the same price, regardless of size, so the kids bought some big ones.  Thankfully, we brought the wagon for just such an occasion.


 The big kids took off for the back of the field with dad to see if there were even larger pumpkins there.  Wednesday followed them for a bit, but then she got worn out. I don't know about pumpkins, but there was no shortage of mud.

Wednesday does a little heavy lifting of our pumpkin haul!

Maritime Studies, or Learning about Flotation


 Awhile ago, I told you about the science experiment kits that I ordered from Kids Woot this summer.  They are wonderful for days when I'm not sure any of us are going to make it until dad gets home.  Last week we had just such a day, so I whipped out the kit about boats and flotation.  It has ten pre-prepared science projects.

I let the kids each pick one and it made things better, at least for awhile.  This is your dose of homeschool reality -- it's good, but it ain't always roses I'm just saying.  :)

Wednesday picked the experiment to determine what objects float.  So the kids ran around the house collecting things to try out, and Zhara recorded what floated and what didn't in the science booklet that came with the kit.

It also suggested, in the same experiment, trying the floating egg trick.  So we learned that an egg will sink in regular water, as the egg is heavier than the water.  However, when you add a considerable amount of salt to the water, the egg floats, because the water is denser due to the dissolved salt.  We were already familiar with the concept -- heck, we live 45 minutes from the Great Salt Lake -- but it was still nice to see it demonstrated
Our floating egg

 Then we did Angus's chosen experiment, which was to use the enclosed clay (I told you these kits were awesome), and to divide it into two equal parts.  With one we molded it into the shape of a boat, with the other we made it into three different shapes -- a ball, a ring, and a disc.  Despite the sameness of size, the boat-shaped clay floated, while the other three did not, because the boat was made into a shape that displaced the water evenly, allowing it to float, while the others did not.

 Finally, with Zhara's experiment we made a rubber band propeller boat out of the enclosed pieces, and drove it in the hot tub, learning about potential stored energy and how it is released.  Wednesday got in for full effect.


Angus then made a boat out of Legos to see if he could get it to float in the same manner as the clay boat, which it did.  Hooray for our own experiments!